
Are you looking for ways to make movement between different parts of your home easier? Are you tired of the sound of your traditional hinged doors being slammed over and over again? If so, pocket doors are a great solution to both problems. Pocket doors run on a track to slide open and shut between different areas inside a house. Understandably, you’re probably wondering how this door can be installed in lieu of a traditional swinging door. Luckily, you can learn how to install a pocket door by reading the rest of this blog.
How To Install A Pocket Door In 5 Easy Steps
Knowing how to install a pocket door can be helpful, whether replacing an old door or constructing a new home. Even if you intend to let a professional install a pocket door in your home, being knowledgeable about the process will help you understand whether or not things are running smoothly. As long as these five steps are followed, your new pocket door should be able to work.
1. Choose The Installation Location
The first part of how to install a pocket door is knowing where you want to install it. Some areas of your home that might benefit from a pocket door include the master bedroom, pantry, laundry room, home office, bathroom, kitchen, dining room, and many others. When determining where you want your pocket door installed, pick an area where a pocket door will improve space and mobility.
2. Measure And Prepare The Space
As soon as you know the installation location for your new pocket door, take the appropriate measurements for your new door and prepare the space. A helpful way to ensure that the door completely fits inside the pocket is to make certain that the door you order is twice the size of the measurements recorded for a standard door. If you are replacing a current door with a pocket one, you’ll also need to remove the old door, the drywall, and the studs to make way for the new frame.
3. Install The Frame
Once the space is prepared, you’ll be ready for this next step in how to install a pocket door. This part involves installing the new door frame. You’ll specifically start with building and then installing the wood header. After installing the header, you’ll need to add the new door stubs and the split jambs. The first split jamb will be positioned with the nailer header, while the other is halfway in the wall’s pocket. If you’re using a kit to help install your pocket door, be sure to pay close attention to any additional guidelines provided by the user manual.
4. Add The Track
Your new pocket door won’t be able to get moving without a track. First, you’ll need to install the metal studs into your track to keep it secure, then add the hangers. You’ll then attach the wheeled carriages to the track before hooking the hangers into them. Finally, you’ll hang the door in a vertical position or plumb.
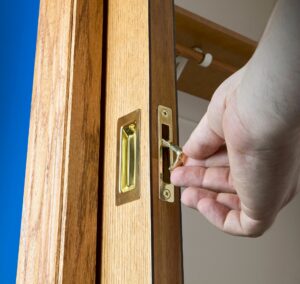
5. Secure The Pocket Door
For this final step in how to install a pocket door, take time to ensure that your new door is nice and secure in its track and pocket. You’ll need to add any latch or locking mechanism you plan to include. Don’t forget to repair the drywall and add the trim. Once secure, you can add any additional aesthetic-based finishes you please. Test the locking mechanism to ensure it works as expected.
Prime Remodeling Will Install Your Pocket Doors!
Hopefully, knowing how to install a pocket door will allow you to feel better about what to expect if and when you decide to invest in one for your home. If you’re planning a home remodeling project in the near future, your doors can also be a part of that project. Luckily, if you contact us at Prime Remodeling, we’ll be able to assist you with all your remodeling needs, including pocket door installations.